 How to: Make a wallpaper for your iPhone using Adobe Photoshop.
In this tutorial, you will learn how to re-purpose a copy of your favorite images to invent your own 3D wallpaper.
Materials:
•3-6 photographs or stock photos
If you are not familiar with Adobe Photoshop, you can view this basic tutorial that goes over the most basic items in the toolbar. For this tutorial, you will need to know how to use the brush tool, transform tool, marquee tool, and layer options.


 8. Next, copy the stretched pixel layer and use the Free Transform tool again to make the second copy taller, but not wider. Then move that new piece above the first copy and use the Transform tool once more to manipulate the image. You'll want to make the image appear as if it is coming from the center. To accomplish this, hold the Command button and drag the middle control box and slide it to the right or left. Finally, press Enter and see how your image has changed. Be sure that the colored pixels are still aligned.

 10. Now we have the basis for each segment. Next, we will deepen the 3-D effect by using the Brush Tool to highlight and shadow different parts of the segment. First, select the warped portion with Command+Clicking the preview box to the right of the layer we're currently working with. Using the Brush Tool with the color black by using a lightweight stroke to avoid hard lines. Then shade the smaller tip so it fades to the background black color. Finally, color the lower end (where it meets the rectangle) with a white color, again using light strokes.


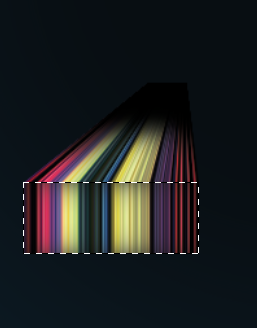
 16. If you arrange the three segments closely, you will want to account for the overlap of each segment and correct any portion that obviously overlaps another. To do this, select the layer's data (which should be merged) and erase a portion of the blackened ends of the overlapping images. Then, select the opposite information by right clicking on the image and "Select Inverse," and shade above or below the overlapping image to further the 3-D illusion.

17. Almost done! Next, we're going to make the colors really pop. To do this, merge all the segmented layers, and make a copy of the newly merged layers. Then, to keep organized, rename the new layer with the function we will perform next: Blur.


21. After we get the image to fit the frame, we can manipulate it to give the image texture. To begin this process, we will need to make sure it does not interfere with the rest of the aesthetics. First, desaturate the texture layer, then lower the opacity and change the Layer Style to "Overlay."


1. Select 3 images that you would like to use to create your wallpaper. For this tutorial, we will use a landscape image, abstract feather photo, and a floral closeup photograph.
Hint: When selecting images, be mindful of what colors are most vibrant consider what the payoff each segment will provide.
2. Start by making a backdrop for your project. This will be important later when making the image more three-dimensional. To do this, open a new document by choosing File>New; or pressing "Command+N" and choosing the following options:
Width: 640 pixels
Height: 1136 pixels
Resolution: 326 pixels/inch
Color Mode: RGB Color
Background Contents: Transparent
3. When your document opens, color the background with a deep blue color. In this tutorial, I am using R: 3; G: 36; B: 68 color combination which is a deep blue color. Then using a large, lightweight brush, make a black circle in the center. This will be important in creating dimension later on. Here, I am using a large 900 px size brush, then a 1400 px brush at 33% opacity.
4. Next, open the three images you would like to use in your wallpaper. Or you can use the three images I'm using:
5. Using a sub-Marquee tool called, "Single Row Marquee Tool," select a portion of each photograph that you feel has the most vibrant colors. The tool itself can be located by right-clicking on the marquee tool and selecting the single row option.
6. After choosing a single row from the first image, use Edit>Cut; or pressing "Command+X" to take out the row. Then Paste the cut segment onto your wallpaper. This also creates a new layer for the cut segment.
7. Using the Transform tool, resize the image. To do this, go to Edit>Free Transform; or press "Command+T" to create a box around the pasted row. Then, drag the middle control box upward to stretch the pixels of the row. Resize as small or as large as you would like, then move it off the center of the black background.
Hint: keep your project organized by making folders for each segment, and name each folder with the name of the photograph. Here, we are using “Landscape,” “Feather,” and, “Floral.”
8. Next, copy the stretched pixel layer and use the Free Transform tool again to make the second copy taller, but not wider. Then move that new piece above the first copy and use the Transform tool once more to manipulate the image. You'll want to make the image appear as if it is coming from the center. To accomplish this, hold the Command button and drag the middle control box and slide it to the right or left. Finally, press Enter and see how your image has changed. Be sure that the colored pixels are still aligned.
9. After you have slanted the upper edge of the longer segment, you can add perspective by again pressing "Command+T" to re-enable the box around the layer. Then right click on the selected layer, and choose "Perspective." After doing this, you can move the upper, outer corners together by selecting one control box and sliding inward toward the center.
10. Now we have the basis for each segment. Next, we will deepen the 3-D effect by using the Brush Tool to highlight and shadow different parts of the segment. First, select the warped portion with Command+Clicking the preview box to the right of the layer we're currently working with. Using the Brush Tool with the color black by using a lightweight stroke to avoid hard lines. Then shade the smaller tip so it fades to the background black color. Finally, color the lower end (where it meets the rectangle) with a white color, again using light strokes.
11. Next, select the rectangle portion, and move that layer above the warped portion by simply dragging it above. Select the rectangle the same way you selected the warped portion. Using the Brush Tool with the color black, shade the edges of the box. This creates the illusion that the segments are coming from the background and the lighting is at the top of the image.
12. Finally, merge the layers and we will follow the same process for the floral image.
13. For the final image, we want to change the perspective to provide some variety. To do this, we will follow the same steps as above, except the warped portion will go downward and the shading/highlighting is slightly different.
14. To begin, we want to start off by arranging the larger, longer portion lower, so we know where we want to take the eventual warping.

15. The difference in lighting is caused by the perspective, so we want to accommodate the perceived lighting by brushing white at the lower edge of the rectangle, and shadowing the connecting border in the warped portion. But, the "farther" end of the warped portion should still be shaded black. Then, arrange the three segments into the desired location.
15. The difference in lighting is caused by the perspective, so we want to accommodate the perceived lighting by brushing white at the lower edge of the rectangle, and shadowing the connecting border in the warped portion. But, the "farther" end of the warped portion should still be shaded black. Then, arrange the three segments into the desired location.
17. Almost done! Next, we're going to make the colors really pop. To do this, merge all the segmented layers, and make a copy of the newly merged layers. Then, to keep organized, rename the new layer with the function we will perform next: Blur.
18. Use Filter>Blur>Gaussian Blur, and choose a radius for the blur. Here I'm using a 4.5 pixel range, but it can be reduced/expanded as you see fit. After applying the filter, use the layer options to change the Layer Style to change the mode to "Color Dodge." Finally, turn the opacity down, so the filter effect does not hide the hard work you just completed.
19. These next few steps are optional, but they add more dimension. Use a stock photo of texture that you like, or use mine:
20. First, open the image, and make a copy of the layer into your working document, but dragging the texture layer to the new layer icon while holding Option. When the texture layer is copied to your new document, it will be quite large. To make it fit, use the Free Transform tool to resize the image. In these pictures, the outlines show how large the image was. We need the texture to fit inside the new document.
21. After we get the image to fit the frame, we can manipulate it to give the image texture. To begin this process, we will need to make sure it does not interfere with the rest of the aesthetics. First, desaturate the texture layer, then lower the opacity and change the Layer Style to "Overlay."
22. You're all done! All you need to do now is save the image as one your iPhone will recognize. To do this, simply go to File> Save As, and choose the option JPEG and then "OK" to the file size dialogue box.